
Creating Banners in Employee Center using Content Experience - A step by step guide
Banners are a quick way to bring attention to important information on your Employee Center portal. In this article, I will walk you through step by step how to create a banner in the middle of the page using Content Experience.
We'll go though 3 major steps to add a banner on a page (example: my_homepage )
Add the built-in Content Experience widget (if not already there)
Create and design the content
Publish the content to the widget instance
Step 0. Add the Content Experience Widget
The Content Experience Widget is a component ServiceNow built to display banners (and other type of content) on Employee Center. If you add multiple banners to the same widget, they will appear as a carousel, allowing users to swipe through banners.
You can place this widget on any page, in any position that fits your design.
Adding this widget on the page is no difference than a regular widget:
Open the my_homepage in Page Designer
Search for Content Experience and drag it to the desired spot
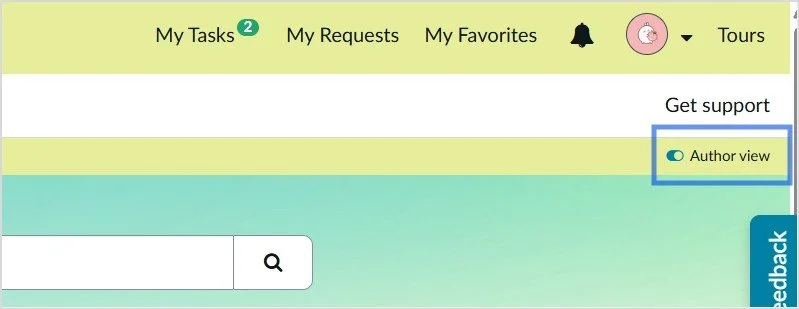
At first, nothing will appear because no content is assigned yet. An easy way to know it's there is to turn the toggle "Author view" on.
If you need 3 banners at different spots, simply add this widget 3 times. In that case, give each widget instance a clear name, so that later it will be easier to identify the right widget when we publish content.
How to name the widget instance
You can find the widget instance on table Instances [sp_instance] or locate it through the portal as follows:
1. On EC portal, right click on the widget and choose Instance Options

2. In this example, CEW - 9 column is the instance name of the CE Widget. To give it a new name, click the hamburger icon then choose Open in Platform

3. In the widget instance record, populate the name in the field Title, this field might be under the tab Presentation
Step 1. Create the content
On the portal, enable Author view on and click Add Content on the desired CE widget.
There are 2 content type available for Service Portal:
Banner - typically used at the top of the page
Styled Content - used for other sections of the page
In this example, our placement is at the middle of the page so we will create a Styled Content.

Step 2. Design
In this stage, you'll see the "editor" with 2 tabs, Design and Publish.

The Design tab is where you create and style the banner. I will not go into the details of this, but here are some main options:
Add heading text
Upload a background image
Add a button (that links to a page or a external site)
Feel free to play around to explore other capabilities.
Tips: As you make changes, click Save to refresh the preview section and see how your banner will probably look.
Step 3. Publish
Once your design is ready, click Save and Continue to switch over to the Publish tab. You'll need to define some options to "post" your hard work.
Where to add this content: Select Service Portal, page my_homepage and the widget would be the one we set up in Step 0.
Audience: The group of users that are able to view this banner
When: How long this banner will stay, it can be active forever, or during a specific duration.
When everything looks good, click Save publish plan. The banner will appear on the portal page in the section you specified.